Maaf, blog ini hanya support dengan Browser

Mozilla FireFox or Google Chrome

Sabtu, 16 Maret 2013

Cara Membuat Tulisan Keren yang Mengikuti Cursor di Blog Mouse
   Cara Membuat Tulisan Keren yang Mengikuti Cursor Mouse di Blog | Halo agan-agan semua , saya capek nih habis pulang sekolah :D . Baiklah , saya akan memberikan sesuatu yang keren nih dan dapat mempercantik tampilan blog kalian semua . Yaitu tutorial tentang "Cara Membuat Tulisan Keren yang Mengikuti Cursor Mouse di Blog" , langsung saja CHECK THIS OUT !!!
  1. Login Ke Akun Blogger ;
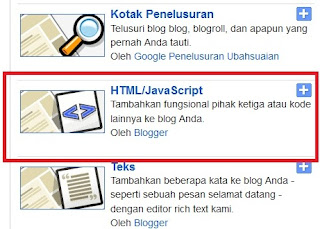
  2. Pilih Tata Letak > Tambahkan Gadget > HTML/JavaScript ;
  3. Cara Membuat Tulisan Keren yang Mengikuti Cursor di Blog Mouser
  4. Lalu masukkan kode dibawah ini :
    <script>
    //mouse
    //Circling text trail- Tim Tilton
    //Kunjungi http://dikyandrean15a.blogspot.com/ untuk script seperti ini dan lainnya
    function cursor_text_circle(){
    // pesan kalian dibawah ini
    var msg=’Diky Andrean Saputra itu Ganteng Loh‘.split(”).reverse().join(”);
    var font=’Verdana,Arial’;
    var size=3; // up to seven
    var color=’#ff0000&#8242;;
    // This is not the rotation speed, its the reaction speed, keep low!
    // Set this to 1 for just plain rotation w/out drag
    var speed=.3;
    // This is the rotation speed, set it negative if you want
    // it to spin clockwise
    var rotation=-.2;
    // Alter no variables past here!, unless you are good
    //—————————————————
    var ns=(document.layers);
    var ie=(document.all);
    var dom=document.getElementById;
    msg=msg.split(”);
    var n=msg.length;
    var a=size*13;
    var currStep=0;
    var ymouse=0;
    var xmouse=0;
    var props=”<font face=”+font+” size=”+size+” color=”+color+”>”;
    if (ie)
    window.pageYOffset=0
    // writes the message
    if (ns){
    for (i=0; i < n; i++)
    document.write(‘<layer name=”nsmsg’+i+’” top=0 left=0 height=’+a+’ width=’+a+’><center>’+props+msg[i]+’</font></center></layer>’);
    }
    else if (ie||dom){
    document.write(‘<div id=”outer” style=”position:absolute;top:0px;left:0px;z-index:30000;”><div style=”position:relative”>’);
    for (i=0; i < n; i++)
    document.write(‘<div id=”iemsg’+(dom&&!ie? i:”)+’” style=”position:absolute;top:0px;left:0;height:’+a+’px;width:’+a+’px;text-align:center;font-weight:normal;cursor:default”>’+props+msg[i]+’</font></div>’);
    document.write(‘</div></div>’);
    }
    (ns)?window.captureEvents(Event.MOUSEMOVE):0;
    function Mouse(evnt){
    ymouse = (ns||(dom&&!ie))?evnt.pageY+20-(window.pageYOffset):event.y; // y-position
    xmouse = (ns||(dom&&!ie))?evnt.pageX+20:event.x-20; // x-position
    }
    if (ns||ie||dom)
    (ns)?window.onMouseMove=Mouse:document.onmousemove=Mouse;
    var y=new Array();
    var x=new Array();
    var Y=new Array();
    var X=new Array();
    for (i=0; i < n; i++){
    y[i]=0;
    x[i]=0;
    Y[i]=0;
    X[i]=0;
    }
    var iecompattest=function(){
    return (document.compatMode && document.compatMode!=”BackCompat”)? document.documentElement : document.body;
    }
    var makecircle=function(){ // rotation properties
    if (ie) outer.style.top=iecompattest().scrollTop+’px’;
    currStep-=rotation;
    for (i=0; i < n; i++){ // makes the circle
    var d=(ns)?document.layers['nsmsg'+i]:ie? iemsg[i].style:document.getElementById(‘iemsg’+i).style;
    d.top=y[i]+a*Math.sin((currStep+i*1)/3.8)+window.pageYOffset-15+(ie||dom? ‘px’ : ”);
    d.left=x[i]+a*Math.cos((currStep+i*1)/3.8)*2+(ie||dom? ‘px’ : ”); // remove *2 for just a plain circle, not oval
    }
    }
    var drag=function(){ // makes the resistance
    y[0]=Math.round(Y[0]+=((ymouse)-Y[0])*speed);
    x[0]=Math.round(X[0]+=((xmouse)-X[0])*speed);
    for (var i=1; i < n; i++){
    y[i]=Math.round(Y[i]+=(y[i-1]-Y[i])*speed);
    x[i]=Math.round(X[i]+=(x[i-1]-X[i])*speed);
    }
    makecircle();
    // not rotation speed, leave at zero
    setTimeout(function(){drag();},10);
    }
    if (ns||ie||dom)
    if ( typeof window.addEventListener != “undefined” )
    window.addEventListener( “load”, drag, false );
    else if ( typeof window.attachEvent != “undefined” )
    window.attachEvent( “onload”, drag );
    else {
    if ( window.onload != null ) {
    var oldOnload = window.onload;
    window.onload = function ( e ) {
    oldOnload( e );
    drag();
    };
    }
    else
    window.onload = drag;
    }
    }
    cursor_text_circle();
    </script>
  5. Simpan , dan lihat hasilnya .
Untuk tulisan yang berwarna merah dapat diganti dengan sesuka hati kalian .
Semoga bermanfaat ^_^ .

Read More
How To Make Elegant Notice On The Blogspot

How To Make Elegant Notice On The Blogspot | Maybe notice is very useful for you , if you wanna to tell your visitors . Now , I want to share How To Make Elegant Notice On The Blogspot , check this out !!!
How To Make Elegant Notice On The Blogspot

Step by step :
  1. Login to Blogger :
  2. Go to Layout > Add Gadget :
  3. Choose HTML/Javascript , and Copy Paste this code :
    <a href="Your Link" target='_blank'><div style="background:#ffd000;border:2px solid #d19700;border-radius:10px;padding:10px;margin:10px;font-size:16px;"> Pasang Iklan di <span style="color:GREEN;font-weight:bold;"> DIEKY'S BLOG </span></div></a>
    • Blue Text just you edit with your link choose ;
    • Red Text just you edit with your Text want  .
    • How To Make Elegant Notice On The Blogspot
     
  4. Click save
Thanks for you attention at  How To Make Elegant Notice On The Blogspot

Read More

Cara Memasang Robots.txt Yang Cepat Terindex Google
Cara Memasang Robots.txt Yang Cepat Terindex Google | Robots.txt itu berperan sangat besar dalam pengindexan suatu blog terhadap search Engine seperti Google. Oleh karena itu , sebaiknya kalian memasang Robots.txt diblog kalian . Akan tetapi , dalam memasang Robots.txt harus dengan hati-hati ya , karena kesalahan sedikit dalam memasang robots.txt pada blog dapat mempengaruhi blog tersebut . Tetap tenang , karena yang akan saya berikan kali ini adalah Robots.txt yang benar . Silahkan ikuti tutorial berikut :

Cara Memasang Robots.txt Yang Cepat Terindex Google
  1. Login Blogger ;
  2. Masuk ke menu Setelan ;
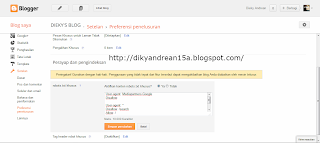
  3. Pilih Prefensi Penelusuran dan pilih yang robots.txt Khusus ;
  4. Aktifkan konten robots.txt khusus ? pilih YA ;
  5. Masukkan kode robots.txt nya :
    Untuk mengambil robots.txt nya , silahkan masuk ke link ini .
  6. Setelah mencopy robots.txt yang tadi , silahkan ganti tulisan yang berwarna biru
    http://url.blogspot.com/feeds/posts/default?orderby=UPDATED , dengan URL blog kalian . 
  7. Setelah itu , silahkan klik Simpan Perubahan ;
  8. Robots.txt yang semula nonaktif , menjadi aktif .

Semoga Bermanfaat ^_^

Read More

Mengedit Blog agar Lebih SEO Friendly


   Mengedit Blog agar Lebih SEO Friendly | Mengubah template blog menjadi SEO Friendly adalah keinginan kalian semua kan pastinya ? . Bagi kalian yang ingin blognya lebih SEO Friendly , silahkan ikuti beberapa tekhnik dari saya berikut ini :

1. Meng-edit Page Title .
   Contoh page Title adalah seperti ini : Mengedit Blog agar Lebih SEO Friendly | Cyb3r meTr0 (blog saya yg lain , yang saya pakaikan Page Title ini) .
Itulah yang dinamakan Page Title , letaknya ada di Title bar browser anda .
Cara mengubahnya agar SEO Friendly yakni seperti berikut :
 Login Blogger > Template > Edit HTML .
Terus cari kode ini <title><data:blog.pageTitle/></title> , agar lebih mudah tekan saja Ctrl+F atau F3 .
Kalau sudah ketemu , hapus kode tersebut dan ganti dengan ini :

<b:if cond='data:blog.pageType == "item"'>
<title><data:blog.pageName/> | <data:blog.title/></title>
<b:else/>
<title><data:blog.pageTitle/></title>
</b:if>
  Bila anda ingin menambahkan beberapa keyword juga bisa , tapi pakai kode yang ini :

<b:if cond='data:blog.pageType == "item"'>
<title><data:blog.pageName/> | <data:blog.title/></title>
<b:else/>
<title><data:blog.pageTitle/> | Keyword | Keyword </title>
</b:if>
   Ganti teks yang berwarna biru dengan Keyword anda , dan bila ingin menambahkan lebih tinggal tambahkan saja lagi ini { | } .

 2. Menambahkan Keyword dan juga Deskripsi .

   Kalian pasti tau dong , mbah google itu sangat menyukai blog yang jelas tentang tema dan juga artikel / konten yang disediakan . Oleh sebab itu , kalian harus menambahkan Meta Tag . Yaitu dengan menambahkan kode dibawah ini diatas kode <b:skin><![CDATA[ .


<b:if cond='data:blog.url == data:blog.homepageUrl'>
<meta name="description" content="Deskripsi Blog" />
<meta name="keywords" content="Keyword , Keyword , Keyword" />
</b:if>
Ganti tulisan Deskripsi Blog dan Keyword sesuai perintah disitu .

3. Menambahkan Breadcrumbs

   Banyak yang menyepelekan fungsi breadcrumbs , padahal breadcrumbs itu sangat bermanfaat untuk SEO . Soalnya , breadcrumbs itu memiliki fungsi layaknya denah menuju lokasi . Sebab , breadcrumbs itu adalah menu navigasi berurutan di atas artikel posting atau istilahnya . Yang berfungsi untuk memudahkan pengunjung agar mengetahui termasuk dalam kategori apakah artikel yang sedang ia baca . Cara untuk memasang breadcrumbs , silahkan klik disini .

4. Menambahkan Widget Related Post

   Widget related post ? sangat berguna dong pastinya ! karena bagus untuk SEO blog dan juga Pengunjung. Cara memasangnya , klik disini .

5. Mengedit Tag Heading .

   Si embah ntuh paling demen ame sebuah tulisan yang menggunakan Tag Heading h1 . Oleh karena itu , sebaiknya blog kalian diubah Tag Headingnya menjadi h1 . Bagus loh untuk SEO . Nih caranya :
   Cari kode yang mirip seperti dibawah ini (AWAS SALAH) :

<b:if cond='data:post.title'>
<h3 class='post-title entry-title'>
<b:if cond='data:post.link'>
<a expr:href='data:post.link'><data:post.title/></a>
<b:else/>
<b:if cond='data:post.url'>
<a expr:href='data:post.url'><data:post.title/></a>
<b:else/>
<data:post.title/>
</b:if>
</b:if>
</h3>
</b:if>
 Ganti h3 menjadi h1 . Trus Cari kode ini ]]></b:skin> , dan paste-kan kode dibawah ini tepat di atas kode ]]></b:skin> .

h1.post-title, .post h1 #Blog1 h1, #Blog2 h1 { font-size:1.5em; }

6. Mematikan fungsi widget arsip .

  Kenapa harus dimatikan ? karena si embah google itu sangat gak suka blog yang duplikat konten , dan itu dapat merusak SEO blog kita . Caranya adalah ke tab setting > Archiving > pada bagian Archiving frequency ubah menjadi no archive > selesai simpan setting . Atau bila kalian tidak ingin mematikan fungsi arsip , bisa juga dengan menambahkan kode berikut tepat di bawah <head> .


<b:if cond='data:blog.pageType == &quot;archive&quot;'><meta content='noindex' name='robots'/></b:if>

 Menurut saya cukup sampai disini , bila masih ada , silahkan tambahkan sendiri di kolom komentar .

Read More

Cara Terbaru Agar Template Blog Menjadi Valid HTML5 2013
   Cara Terbaru Agar Template Blog Menjadi Valid HTML5 2013 | Kali ini saya akan membagikan sebuah tips terbaru agar template blog kalian menjadi Valid HTML5 . Emang apa sih keuntungannya kalo template blog itu Valid HTML5 ?
Keuntungannya yaitu :

1. Dapat ditulis dalam sintaks HTML (dengan tipe media teks/html) dan XML ;
2. Integrasi yang lebih baik dengan aplikasi web dan pemrosesannya ;
3. Integrasi (’inline’) MathML dan SVG dengan doctype yang lebih sederhana ;
4. Penulisan kode yang lebih efisien ;
5. Dapat dimengerti oleh peramban lawas (backwards compatible) , Sehingga istilah ‘deprecated’ tidak akan diperlukan lagi .

Pengen langsung Valid HTML5 ? Ikuti tutorial dibawah ini :

  1. Login ke akun Blogger kalian ;
  2. Masuk ke Template > Edit HTML ;
  3. Setelah itu Klik Lanjutkan dan jangan lupa Centang "Expand Template Widget" ;
  4. Hapus kode yang berada diatas kode <head> , lalu ganti dengan kode berikut :
    <?xml version="1.0" encoding="UTF-8" ?>
    <!DOCTYPE html>
    <HTML> 
  5. Jangan lupa ganti </html> dengan </HTML> ;
  6. Bila kalian menemukan kode seperti ini :
    <b:skin><![CDATA[/*
    -----------------------------------------------
    Blogger : Oppa Gangnam Style
    Name    :     Sexy Lady
    Date      :     03 Feb 2013
    ----------------------------------------------*/

    hapus tanda "-" , sehingga menjadi :
    <b:skin><![CDATA[/*

    Blogger : Oppa Gangnam Style
    Name : Sexy Lady
    Date : 03 Feb 2013

    */
  7. Hapus semua kode seperti berikut :
    • <b:include name='quickedit'/> [Hapuslah kode ini setiap kali kalian menambahkan widget baru] , dan ;
    • <a expr:name='data:post.id'/> .
  8. Masukkan kode dibawah ini tepat DIBAWAH kode </head>
    <!-- <body><div></div> -->
  9. Simpan templatenya .
  10. Apabila kalian mempostingan sesuatu yang memuat gambar didalamnya , selalu gunakan kode ini :
    <div class="separator" style="clear: both; text-align: center;">
    <img alt="Keyword Gambar" height="236" src="URL GAMBAR" title="JUDUL Gambar" width="320" /></div>

Setelah itu, silahkan kalian cek blog kalian disini .
Sekian tips dari saya , semoga bermanfaat .

Read More

Unit Test Data Untuk Template blogspot

This is a sticky post!!! Make sure it sticks!
This should then split into other pages with layout, images, HTML tags, and other things.

Paragraph Alignment Tests

Default Paragraph

Lorem Ipsum is simply dummy text of the printing and typesetting industry. Lorem Ipsum has been the industry's standard dummy text ever since the 1500s, when an unknown printer took a galley of type and scrambled it to make a type specimen book. It has survived not only five centuries, but also the leap into electronic typesetting, remaining essentially unchanged. It was popularised in the 1960s with the release of Letraset sheets containing Lorem Ipsum passages, and more recently with desktop publishing software like Aldus PageMaker including versions of Lorem Ipsum.

Left align

Lorem ipsum dolor sit amet, consectetuer adipiscing elit. Sed odio nibh, tincidunt adipiscing, pretium nec, tincidunt id, enim. Fusce scelerisque nunc vitae nisl. Quisque quis urna in velit dictum pellentesque. Vivamus a quam. Curabitur eu tortor id turpis tristique adipiscing. Morbi blandit. Maecenas vel est. Nunc aliquam, orci at accumsan commodo, libero nibh euismod augue, a ullamcorper velit dui et purus. Aenean volutpat, ipsum ac imperdiet fermentum, dui dui suscipit arcu, vitae dictum purus diam ac ligula. Praesent enim nunc, pretium eget, tincidunt in, semper at, mauris. Etiam nec ligula. Aenean purus pede, sagittis at, blandit a, dignissim nec, elit. Etiam nunc. Praesent molestie consectetuer leo. Etiam blandit leo mollis velit. Aenean varius. Maecenas in magna nec justo ornare feugiat. Mauris elit. Nunc volutpat lectus fermentum nibh.

Center Align

Aenean a turpis eu augue luctus vulputate. Ut nonummy arcu in est. Nulla facilisi. Fusce at est sollicitudin pede gravida luctus. Sed ut dolor non nulla luctus aliquam. Phasellus sodales dapibus turpis. Nulla malesuada. In sed quam. Donec sollicitudin convallis nisl. Donec nunc. Suspendisse malesuada libero in nisi. Etiam vitae metus non arcu gravida tincidunt. Duis accumsan purus et orci. Curabitur volutpat. Nulla quis purus id enim dapibus malesuada. Nam egestas luctus arcu. Praesent iaculis massa.

Right Align

Aenean tempor, risus nec eleifend tristique, sem orci aliquam urna, eget iaculis tortor mauris ut lorem. Aenean eu tellus. Sed at mauris at nisl ultricies lobortis. Vivamus lacinia, lorem vel congue facilisis, leo leo sodales leo, vitae euismod velit ante a ligula. Vivamus sit amet turpis ut eros molestie porttitor. Nam erat lacus, auctor vel, dictum a, suscipit sed, orci. Quisque est lorem, facilisis consequat, sagittis a, ullamcorper at, ante. Nullam ultricies gravida dui. Nunc mauris. Quisque neque. Quisque eu sem.

Justified

Vivamus volutpat, arcu sed venenatis consequat, nulla pede blandit neque, quis ultrices ligula mauris ut leo. Proin iaculis. Pellentesque vulputate magna at lectus. Etiam semper aliquet lectus. Nullam turpis. Vivamus sed lacus. Integer metus arcu, adipiscing sed, vehicula et, vulputate sit amet, massa. Sed lobortis tempus lectus. In lacus. Duis nibh. Donec molestie libero ut neque. In sollicitudin aliquam felis. Sed molestie libero ac mi. Curabitur magna nunc, feugiat sed, sodales vitae, pretium a, leo. Sed ut ante. Integer turpis ante, facilisis sed, dignissim vitae, consectetuer sed, dui. Sed ultricies.

Header one

Header two

Header three

Header four

Header five
Header six

Blockquote Tests

Here's a one line quote.
This part isn't quoted. Here's a longer quote:
It’s like a language. You learn the alphabet, which are the scales. You learn sentences, which are the chords. And then you talk extemporaneously with the horn. It’s a wonderful thing to speak extemporaneously, which is something I’ve never gotten the hang of. But musically I love to talk just off the top of my head. And that’s what jazz music is all about.Stan Getz
And some trailing text.

Table Layout Test

Title Views
About Test User 1 More
260 1 More
Archives 1 More
235 1 More

List Type Tests

Definition List

Definition List Title
This is a definition list division.
Definition
An exact statement or description of the nature, scope, or meaning of something: our definition of what constitutes poetry.
Gallery
A feature introduced with WordPress 2.5, that is specifically an exposition of images attached to a post. In that same vein, an upload is "attached to a post" when you upload it while editing a post.
Gravatar
A globally recognized avatar (a graphic image or picture that represents a user). A gravatar is associated with an email address, and is maintained by the Gravatar.com service. Using this service, a blog owner can configure their blog so that a user's gravatar is displayed along with their comments.

Unordered List (Nested)

  • List item one
    • List item one
      • List item one
      • List item two
      • List item three
      • List item four
    • List item two
    • List item three
    • List item four
  • List item two
  • List item three
  • List item four

Ordered List

  1. List item one
    1. List item one
      1. List item one
      2. List item two
      3. List item three
      4. List item four
    2. List item two
    3. List item three
    4. List item four
  2. List item two
  3. List item three
  4. List item four

HTML Element Tag Tests

All other HTML tags listed in the FAQ:
Here is the address for Automattic, using the <address> tag:

355 1st Street Suite 202 San Francisco, CA 94105 United States
This is an example of an <anchor> (otherwise known as a link). This abbr. is an example of an <abbr> tag in the middle of a sentence. Here is a TLA showing off the <acronym> tag. What, you want to see some over-sized text using the <big> tag? Can you cite a reference for that, using the <cite> tag? Have you noticed that all of the tag names are displayed in code-form, using the <code> tag? Similarly, I could emulate keyboard text, using the <kbd> text tag, or emulate teletype text using the <tt> tag. Oh no! I wrote something incorrectly.
I'd better delete it, using the <del> tag. I could alternately strike something out using the <strike> tag, or strike something out using the <s> tag. So many choices, which I emphasize using the <em> tag. Just to clarify,
this is some inserted text, that I'll highlight using the <ins> tag. Need to display completely unformatted text, such as a large block of code? Use the <pre> tag, which lets you display:
#container {
 float: left;
 margin: 0 -240px 0 0;
 width: 100%;
}
Want to quote the WordPress tagline Code is Poetry? Use the <q> tag to add quotes around it. This is strong text (otherwise known as bold), using the <strong> tag. Need to write H2O or E = MC2? You may find great use for subscripting text using the <sub> tag, or for superscripting text using the <sup> tag. Need to call out a variable? Use the <var> tag.

Div and Span Tests

Lorem ipsum dolor sit amet, consectetuer adipiscing elit.
This is a div with "myclass" class, inside of another div, using the <div> tag.
Sed odio nibh, tincidunt adipiscing, pretium nec, tincidunt id, enim. Fusce scelerisque nunc vitae nisl.

Read More

Selasa, 05 Maret 2013


Lorem Ipsum Nabillah

Lorem ipsum dolor sit amet, consectetur adipisicing elit, sed do eiusmod tempor incididunt ut labore et dolore magna aliqua. Ut enim ad minim veniam, quis nostrud exercitation ullamco laboris nisi ut aliquip ex ea commodo consequat. Duis aute irure dolor in reprehenderit in voluptate velit esse cillum dolore eu fugiat nulla pariatur. Excepteur sint occaecat cupidatat non proident, sunt in culpa qui officia deserunt mollit anim id est laborum.
  • Lorem Ipsum list menu
  • Lorem ipsum list menu
  • Lorem ipsum list menu
  1. Lorem Ipsum list menu
  2. Lorem ipsum list menu
  3. Lorem ipsum list menu

Heading1

Heading2

Heading3

Heading4

Heading5
Heading6
Lorem ipsum blockquote. Lorem ipsum blockquote. Lorem ipsum blockquote. 

Read More


Copyright © 2013 | Blog Walking Mania - All Rights Reserved . Design by DIEKY'S BLOG - Powered by Blogger